
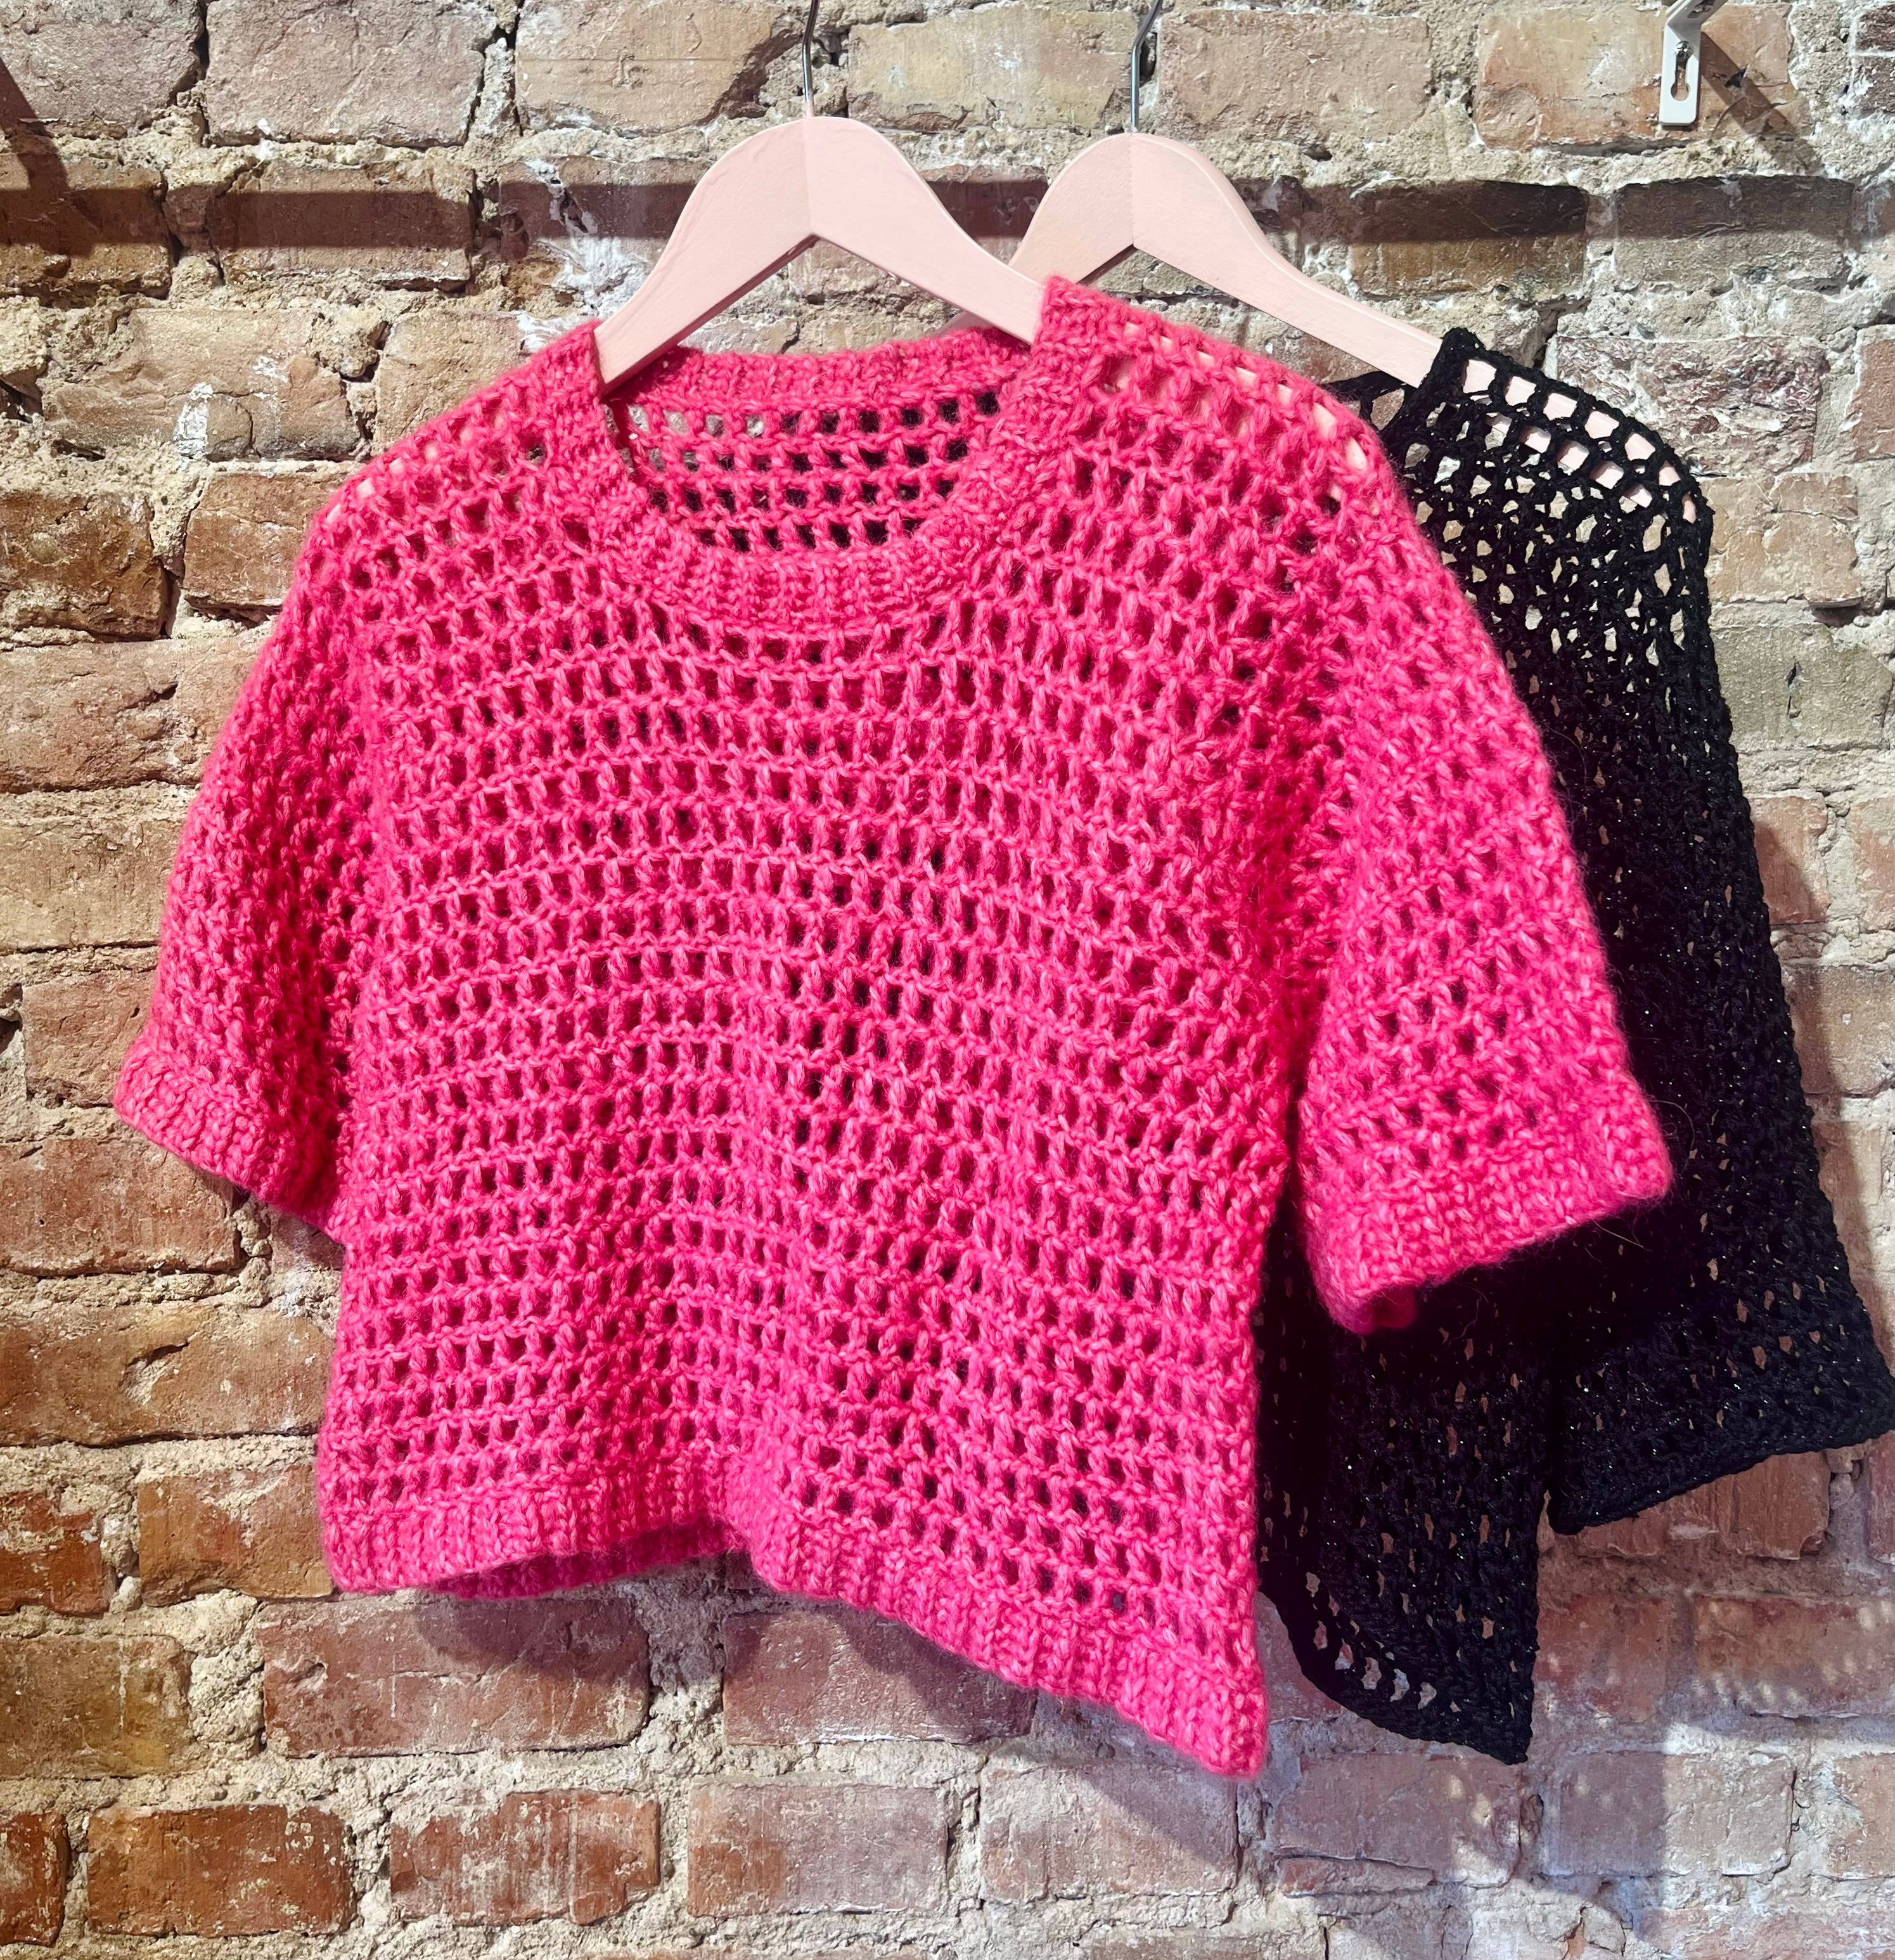
Blötsnö Tee

To fit chest
75 (85) 95 (105) 115 (125) 135 (145) 155 cm
Chest circumference
82 (91) 100 (109) 117 (128) 137 (146) 157 cm
To be crocheted with 2-5 cm of positive ease.
Length, from shoulder to bottom hem, including ribbing
43 (43) 46 (46) 49 (50) 54 (54) 57 cm
Length is customizable, but if you choose to make the vest longer, keep in mind that you will need more yarn.
Gauge for 10x10 cm: 7 stitches by 6 rows in pattern on hook 4.5mm, or hook needed to meet gauge.
Materials
4,5mm crochet hook.
Approximately 525 (575) 625 (685) 760 (830) 915 (1000) 1100 meters of Aran/Worsted Weight yarn, or yarns held together adding up to that weight.
For the pink version I used Halaus by Novita, for the black version I used one strand of Alma by Mondial held together with one strand Paia by Filcolana.
The pattern is made in dc mesh. It’s crocheted top down, seamlessly with an inset sleeve shaped by short rows. The pattern is then finished with either a yarn over slip stitch ribbing or a crochet I-cord, whatever you prefer. Video instructions on how to crochet an I-cord is available in the “Techniques” highlight of my instagram @honsedesign
For chests with a corresponding cup size of C or higher, there is an option to make bust darts for a more shaped fit. The darts will mainly add length to the chest section, but will allow for more room in the chest. If your waist is significantly narrower than your chest (a difference of 20 cm or more) and you are making the option with bust darts, you may want to size down. So if your chest measurement is 125, and your waist is 100, and you want to make bust darts, follow the instructions for size 115.
All sizes have varying instructions, if any part of the pattern is not applicable to a size, the number for that size is replaced by an X.
Abbreviations
ch - chain loop
dc - double crochet
sl st - slip stitch
yoss - yarn over slip stitch
blo - back loop only
st/sts - stitch/stitches
moss st - moss stitch
Eor - end of row
How to crochet dc mesh:
First row: turn, ch 4, in the 4th st from hook, dc 1, *ch 1 while skipping the next st, dc 1 in the st after the skipped st*, repeat *-* to EOR
Next row: turn, ch 4, skip the first dc, dc 1 in the next dc, *ch over the next ch, dc 1 in the next dc*, repeat *-* to EOR.
Mesh stitches are counted as you would count regular double crochets, you simply count the number of double crochets you have on a row, and not the chains in between. The only exception to this are the chains at the beginning of every row, as they count as the first stitch of row. For the foundation chain, only 3 chains make up the first stitch, this is done for stability. All other rows have 4 chains making up the first stitch.
Crocheting the Tee
Back
Row 1: with hook 4.5mm, ch 48 (52) 52 (56) 60 (60) 64 (68) 68
Row 2: turn, in the 4th st from hook, dc 1, *ch 1 while skipping the next st, dc 1 in the st after the skipped st*, repeat *-* to EOR, this is the right side of your work. Now you have a total of 24 (26) 26 (28) 30 (30) 32 (34) 34 mesh sts.
Row 3: turn, ch 4, crochet in dc mesh to EOR, this is the wrong side of your work.
Repeat row 3 until you have a total of 10 rows
Now you’ll start working increases to shape the armpit. The number of increase rounds and stitches per round vary between sizes, so make sure you read carefully.
*Row 11: turn, ch 4 and skip the final dc from previous row, dc 1, ch 1, dc 1 in the next dc, ch over the ch from previous row, resume regular dc mesh until you have 2 dcs left on row, repeat increase, ch 1 and dc 1 in the final st of row. Now you have a total of 26 (28) 28 (30) 32 (32) 34 (36) 36 mesh sts
Row 12: turn, ch 1, crochet in dc mesh to EOR*
Do *-* a total of 2 (2) 3 (3) 3 (3) 3 (3) 3 times, until you have a total of 28 (30) 32 (34) 36 (36) 38 (40) 40 sts on row 14 (14) 16 (16) 16 (16) 16 (16) 16
For sizes 75 (85) 95 (105) 115, fasten off and move on to “Front”
For sizes (125) 135 (145) 155, you’ll make additional rows of increases.
*Row 17: turn, ch 4 and skip the final dc from previous row, dc 1, ch 1, dc 1 in the next dc, ch 1, in the next dc: dc 1, ch 1, dc 1, resume regular dc mesh until you have 3 dcs left on row, repeat increase over the next 2 sts, ch 1 and dc 1 in the final st of row. Now you have a total of x (x) x (x) x (40) 42 (44) 44 sts
Row 18: crochet in dc mesh to EOR*
Do *-* a total of x (x) x (x) x (1) 1 (1) 2 times, until you have a total of x (x) x (x) x (40) 42 (44) 48 sts on row x (x) x (x) x (18) 18 (18) 20, fasten off and move on to “Front”
Front
For the front, you’re going to start with the shoulders and work from the same foundation chain as the back body. To keep odd and even rows matching the back body, the foundation chain will serve as row 1 for the front, and you start working on row 2.
Right shoulder
Row 2: With the right side facing you, and the top of the back panel pointing away from you, insert hook in the outer stitch of the top right corner and pick up yarn, ch 4. Proceed to crochet in dc mesh until you have a total of 6 (7) 7 (8) 8 (8) 9 (10) 10 sts, including the st that is made up of the first 4 chains.
Row 3: turn, ch 4, dc mesh to EOR
Row 4: repeat row 3
Now you’ll start working increases that shape the neck opening
Row 5: turn, ch 4 and skip the final dc from previous row, dc 1, ch 1, dc 1 in the next dc, ch over the ch from previous row, resume regular dc mesh to EOR, now you have a total of 7 (8) 8 (9) 9 (9) 10 (11) 11 sts
Row 6: turn, ch 4, dc mesh to EOR
Fasten off.
Left shoulder
Row 2: With the wrong side facing you, and the top of the back panel pointing away from you, , count 6 (7) 7 (8) 8 (8) 9 (10) 10 sts from EOR, insert hook in this st, pick up yarn, ch 4, crochet in dc mesh to EOR
Row 3: turn, ch 4, dc mesh to EOR
Row 4: repeat row 3
Now you’ll start working increases that shape the neck opening
Row 5: turn, ch 4, dc mesh until you have 2 sts left on row, dc 1, ch 1, dc 1 in second-to-last dc, ch1, dc in last st, now you have a total of 7 (8) 8 (9) 9 (9) 10 (11) 11 sts
Row 6: turn, ch 4, dc mesh to EOR
Do not fasten off, move on to “Joining the front”
Joining the front
Row 7: turn, ch 4, dc mesh until you have 1 st left on row, dc 1, ch 1, dc 1 in this st, ch 17 (17) 17 (17) 21 (21) 21 (21) 25, in the next st of the Right shoulder, dc 1, ch 1, dc 1, resume regular dc mesh to EOR.
Row 8: turn, ch 4, dc mesh to EOR, including in every other st of the new chains that form the neckline (just like you did for your foundation chain). Now you have a total of 24 (26) 26 (28) 30 (30) 32 (34) 34 mesh sts.
Row 9 and following: repeat instructions for “Back”, including the increases, until you have a total of 14 (14) 16 (16) 16 (18) 18 (18) 20 rows.
If you are making bust darts, do not fasten off, move on to “Bust shaping”
If you are not making bust darts, fasten off and move on to “Joining the body” if you’re doing a straight fit.
Bust shaping
The bust shaping is done by combining taller and shorter stitches. These rows will not have row numbers assigned to them, as they’re not full rows they won’t affect the row count.
Bust dart
First row:
Turn, ch 2
In the next dc: sl st 1, ch 1 over the next ch
In each of the next 3 dcs: sc 1, ch 1 over the next ch
In each of the next 3 dcs: hdc 1, ch 1 over the next ch
Proceed to crochet in dc mesh until you have 8 mesh sts left on row
In each of the next 3 dcs: hdc 1, ch 1 over the next ch
In each of the next 3 dcs: sc 1, ch 1 over the next ch
In the next dc: sl st 1, ch 1 over the next ch,
In the final dc: sl st 1
Next row:
Turn, ch 2
In the next sl st: sl st 1, ch 1 over the next ch
In each of the next 3 scs: sc 1, ch 1 over the next ch
In each of the next 3 hdcs: hdc 1, ch 1 over the next ch
Proceed to crochet in dc mesh until you have 8 mesh sts left on row
In each of the next 3 hdcs: hdc 1, ch 1 over the next ch
In each of the next 3 scs: sc 1, ch 1 over the next ch
In the next sl st: sl st 1, ch over the next ch
In the final dc: sl st 1
Fasten off.
Joining the body
The rest of the body is worked in one panel, and you’ll join the back and front pieces together in Row 15. If you made bust darts, simply treat the lower sts as regular dc mesh sts. The body is worked in turned rounds, by slip stitch joining the first and last stitches of the row, then turning and working in the opposite direction.
Row 15 (15) 17 (17) 17 (19) 19 (19) 21: With the wrong side facing you, go back to where you fastened off the back, insert hook in the final st of back and ch 4, crochet in dc mesh over the back panel, ch 3 (5) 7 (9) 11 (11) 13 (15) 15, crochet in dc mesh over the front panel, ch 3 (5) 7 (9) 11 (11) 13 (15) 15, sl st join to first st of row.
Row 16 (16) 18 (18) 18 (20) 20 (20) 22: turn, ch 4, crochet in dc mesh to EOR, including in every other of the new chains. Now you have a total of 58 (64) 72 (76) 82 (90) 96 (102) 110 sts.
Row 17 (17) 19 (19) 19 (21) 21 (21) 23: turn, ch 4, dc mesh to EOR, sl st join to first st of row.
Repeat previous row until you have a total of 25 (25) 27 (27) 29 (29) 31 (31) 33 rows, or until the T-shirt measures approximately 3 (3) 3 (3) 3 (4) 4 (4) 4 cm shorter than your desired length.
Do not fasten off, move on to “Ribbing - Bottom Ribbing”
Sleeves
To shape the sleeve you will start by working a short row, and then on every row that short row will increase by one stitch. The first st of every row will consist of 3 chains as opposed to 4, and the last st of every row should be a hdc, so as to not make a large gap over the increases. The rest of the sts are crocheted in regular dc mesh. For the first row of the sleeves, you will crochet the dc mesh in the joins of the rows from the body (see photo in GC - will be added to pattern upon release). You will also make a dc mesh st in the foundation chain, as this serves as a join.
Start by placing a stitch marker in the join between row 10 and 11 on both the front and the back, on both the left and right sides of the body.
Right Sleeve
Row 1: With the right side facing up, attach yarn in the marked st on the back right of the body, ch 3, crochet in dc mesh until you reach the other marked st on row, in the marked st, hdc 1. Now you have a total of 19 sts
Row 2: turn, ch 3, crochet in dc mesh until you have one st left on row, hdc 1 and ch 1. You’ll now make an increase by first essentially crocheting 2 sts together, while still increasing by one st and then increasing another stitch by working down the rows of the body. This is done to reduce the gap in the increase between the sts. Do this in the following way:
*Yarn over, insert hook in the join between the previous row of the sleeve and the body
Pull yarn through
Yarn over and pull through 2 of the loops on your hook
Yarn over, insert hook in the next join of body
Pull yarn through
Yarn over and pull through 2 of the loops on your hook
Yarn over and pull through all remaining loops on your hook
Ch 1, in the next join of body hdc 1.*
Now you have a total of 21 sts
Row 3: turn, ch 3, hdc 1 in the increase stitch where you crocheted 2 stitches together, ch 1, crochet in dc mesh until you have one st left on row, hdc 1 and ch 1, then do *-* one time. Now you have a total of 23 sts
Repeat row 3 until you have a total of 27 (27) 31 (31) 35 (35) 37 (37) 39 sts on row 5 (5) 7 (7) 7 (9) 9 (9) 11.
Now you’ll continue to pick up new stitches in the same manner as above, but to shape the sleeve you will also decrease by two sts in the following way:
Row 6 (6) 8 (8) 10 (10) 12 (12) 14: turn, ch 3, hdc 1 in the increase stitch where you crocheted 2 stitches together, ch 1, dc 1, ch 1,dc2tog, ch 1, dc 1, ch 1, dc2tog, ch 1, resume regular crochet in dc mesh until you have one st left on row, hdc 1 and ch 1.
Do *-* one time
Your stitch count is now the same as on the previous row.
Repeat the previous row a total of 4 times, until you have picked up stitches all the way around the sleeve opening. When you reach the new stitches under the armpit, and also work into the joins of these in the same way you did in the joins of the body row. Depending on how many new stitches you have under the armpit you might find that the final row before joining will require only one pair of increases/decreases, this is to ensure a proper fit. Before joining you should have a total of 9 (10) 13 (13) 13 (15) 16 (17) 19 rows on your sleeve.
Do not fasten off, move on to “Joining the sleeve”
Joining the sleeve
The rest of the sleeve is worked in turned rounds, by slip stitch joining the first and last stitches of the row, then turning and working in the opposite direction.
Row 10 (10) 12 (12) 12 (14) 14 (14) 16: turn, ch 4, crochet in dc mesh to EOR, sl st join to first st of row.
Repeat the previous row until you have a total of 15 (15) 19 (19) 19 (21) 21 (21) 23 rows, or until the sleeve measures approximately 3 (3) 3 (3) 3 (4) 4 (4) 4 cm shorter than your desired length. Make sure to end on an odd row.
Do not fasten off, move on to “Ribbing - Sleeve Ribbing” or “I-cord”
Ribbing
You will now work ribbing on all openings where the rows go perpendicular from the body. Instead of making a turning chain when you work close to the body, sl st 1 in in the next dc or next row the body to make the ribbing seamless. All ribbings are worked from the right side. The exact number of rows isn't important, but as a guideline the number of rows should be approximately twice the number of mesh sts or rows from which you are working.
Bottom ribbing
Row 1: ch 4 (4) 4 (4) 4 (5) 5 (5) 5
*Row 2: turn, ch 1, yoss blo to EOR, slst in next body row
Row 3: turn, sk slst. yoss blo to EOR*
Repeat *-* until you reach your starting point. Fasten off but leave a long tail to sew the first and last rows together with the mattress stitch.
Sleeve ribbing
Row 1: ch 4 (4) 4 (4) 4 (5) 5 (5) 5
*Row 2: turn, ch 1, yoss blo to EOR
Row 3: turn, yoss blo to EOR*
Repeat *-* until you reach your starting point. Fasten off but leave a long tail that you use to sew the first and last row together with a mattress stitch.
Neck ribbing
Row 1: Insert hook in right shoulder join, pick up main yarn, ch 4 (4) 4 (4) 4 (5) 5 (5) 5
*Row 2: turn, ch 1, yoss blo to EOR
Row 3: turn, yoss blo to EOR*
Repeat *-* until you reach your starting point. Fasten off but leave a long tail that you use to sew the first and last row together with a mattress stitch.
I-cord
The i-cord is crocheted the same way for body, sleeves and neckline, for a video tutorial go to my instagram.
Row 1: with the right side facing you, attach yarn any stitch at the edges of your sleeve, bottom hem or neckline, ch 1. Proceed to work 1 yoss in dc and 1 yoss under each chain all the way around. Sl st into first st of row to join.
Row 2: turn, ch 1, yoss blo to EOR, sl st into first st of row to join.
Row 3: turn, ch 1, sl st in the back loop while also picking up the back loop from the first row of the I-cord edge to EOR. Sl st into first st of row to join. FO.
Assembly
Weave in any loose ends and block using an appropriate method for your yarn.
Finns det möjlighet att få mönstret på svenska? 🥰
I am really struggling to get gauge on this one, even with a 7.00mm hook!